The 8x10 Camera Project
Emboldened by the success of my 5x4 cigar box camera, I thought I would see if the general concept would scale to 8x10. Rather than spend time building the basic chassis, I found a couple of wooden boxes at a local craft store. They are about 3” (75mm) deep, and a little larger than an 8x10 film holder. Construction seems to be bass wood or something similar - no hard woods - and thicknesses range from 1/8” plywood to 1/4” for the sides. Very light, but in need of reinforcement for the job. The idea is to stack the boxes to get something close to 150mm pinhole to film distance. This will mean mounting the pinhole in the base of one box, and cutting a large hole in the base of the other. The open top of the second box will hold the film holder using the lid in a similar manner to the cigar box 4x5.
This actually worked fairly well.
Scope creep
While I was sketching out the general design, it occurred to me that I could make a standard Linhof/Wista lens board mount for the pinhole. This would allow real lenses to be mounted. If lenses are to be used, the boxes will need to be separable to put in some form of bellows. And I would need a focus screen in place of the film holder.
Fortunately none of these changes would affect the pinhole function, except that the boxes would need a light trap joint and elastic ties to keep them together. Even using the lens board mount is not unreasonable as the pinhole panel can be used on my 4x5 camera. Only the focus screen and bellows have to be made for general photography, and they can be deferred.
The only lens I have that covers 8x10 is a Schneider 270mm f9 G-Claron - it is the ‘long’ lens from my 5x4 Wista kit. The image circle for this lens only just covers 8x10 at f22 at infinity, so any movements will have to be at the back to keep the lens axis in the center of the frame. So back tilt and swing are about the limit, and even here the axis of the movements may be limiting. Rear shift, rise and fall are of limited value unless I get a lens with more coverage. Front movements are also out for the same reason, unless I am working close up, in which case there will be a little extra coverage.
The boxes are not square, and I plan to do without a rotating back, so this means the tilt and swing will become swing and tilt in portrait mode.
This leads to the decision about the basic design. Baseboard or monorail? The whole unit should be reasonably light, so I am thinking of a monorail with clamps for the front and rear standards and the tripod mount in the usual way. In practice the front standard will be fixed when assembled, and the rear standard will be the focus one. If I use a round rail, I can rotate the standards on the rail relative to the tripod, and get the change in orientation. Using the pan/tilt head on the tripod it should be possible to reverse the two tilts and keep the center of gravity closer to the tripod centre.
Using a square section rail would avoid any risk of twisting the camera body/bellows when focusing. However this would limit simple landscape to portrait orientation changes to the tripod head, causing an off-center position. It would be possible to slide one standard off the rail and then change the orientation of the mount 90 degrees before reassembling the standards on the rail, but this would not be quick.
The third option, which avoids making custom rail clamps is to use the paired square section rails in the style of Rudolf Mittleman (see Rudolf’s camera page for his implementation).
The focus screen will be manufactured as a replacement for a film holder. As the box lid is clamped against the holder and then the box body, the box body is the reference surface. So long as the focus screen is correct for the depth of the film in the holder, the back of the unit is not important. This means cutting an opening in the box lid in order to see the screen.
The 8x10 monorail
Cameras capable of 8x10 in. are not particularly common, and not inexpensive, even used. Building my own camera would keep the initial cost down and avoid investing funds in a format I might not want to use. It may well turn out that 4x5 will beter\suit my needs. The key points of the design are:
- Has to handle the 270mm G-Claron f9 with at least double extension. Should be capable of handling a 355mm lens with average focus extension.
- Needs to offer rear tilt and rise/fall as the minimum movements, available in portrait and landscape orientation.
- Monorail construction.
Rail
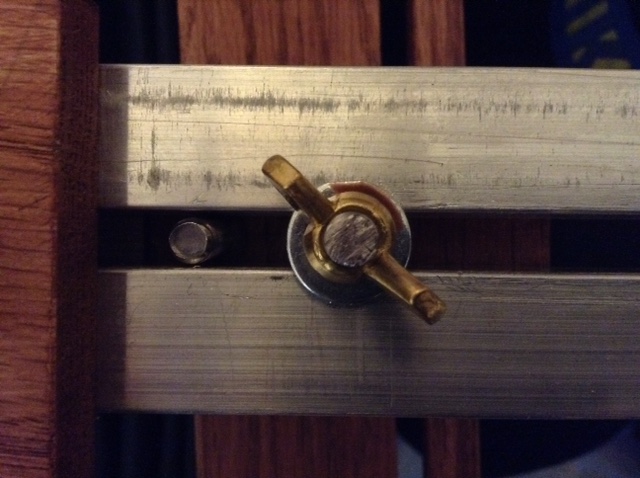
The rail is constructed from two 2’ lengths of 3/4” aluminium tube. These are spaced just wide enough apart to accommodate 1/4”-20 carriage bolts. The head construction on carriage bolts means they will not rotate in the slot.
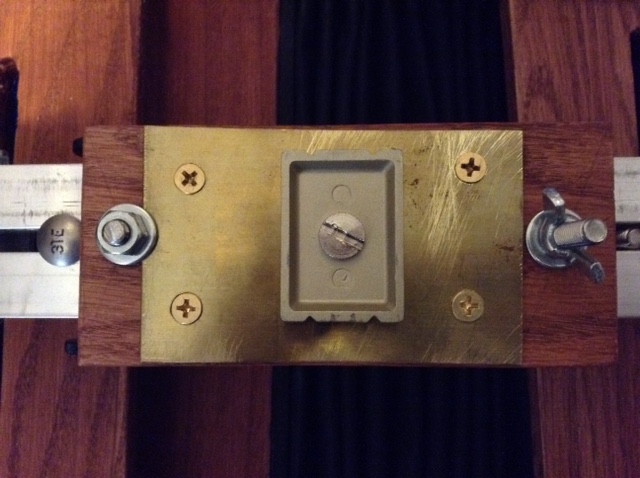 The tripod mount is made from two pieces of hardwood with a 1/4”-20 nut embedded for the tripod mount. Two more carriage bolds are used to clamp the wood above and below the rail for a friction grip. A sheet of brass is screwed down over the embedded nut to handle the torque of clamping down a big camera, and possibly tilting it 90 degrees.
Front and rear standards
The front and rear standards are based on a strip of hard wood with a slot routed for another 1/4”-20 carriage bolt. This provides swing and shift. Rise and fall is provided by using slotted metal pieces. On the rear these are from cannibalised friction lid (chest or cabinet lid) supports while the front uses the metal pieces from a couple of cheap T-bevels. In retrospect the stainless steel T-bevel material is better, and will likely replace the the rear components at some point.
Rear focus
The size of the camera really dictates some form of rear focus. I decided to incorporate an old BPM Products focus rail that was languishing in my 35mm kit. This gives a rack and pinion focus range of around 100mm, which is plenty. The standards are both movable to get to infinity spacing. The draw-back to adding the focus rail is that it adds another 1.5” between the rail and the base of the standard, which has to be matched at the front.
Focus screen
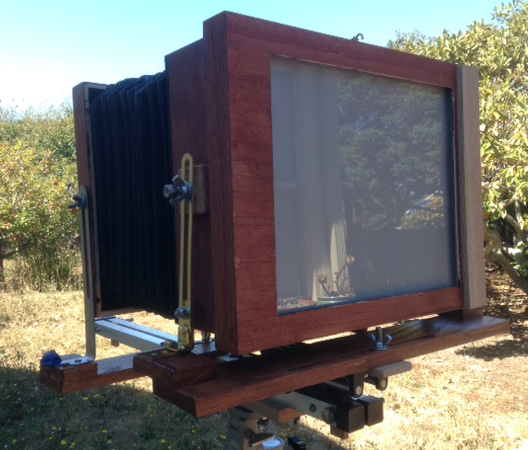
The base of the screen is clear acrylic sheet faced with thin tracing film. This may be replaced with a ground surface in the future, but it is good enough for the initial testing phase. The screen is mounted in a frame and fits like a film holder. A full spring back would be nice, but the film holder mount was already available from the pinhole configuration.
Lens mount
The lens mount is a composite design which can accommodate the Linhof/Wista and MPP VII boards from my 5x4 kit. It should handle most 4x4” square boards, though it might not work with Copal 3 and other large shutters and matching lenses. Reworking it will not be too difficult as there is plenty of space on the front standard.
Bellows
This is probably the heaviest and possibly the most ugly bellows ever put on a camera of this size. It is made from two layers of rubberised blackout material (which I had), thin card stiffeners, and cloth tape for the corner binding. The panels were made about 3/4” under width, and the cloth tape provides the extra flexibility for the pleat ends. The basic material would never fold properly otherwise.
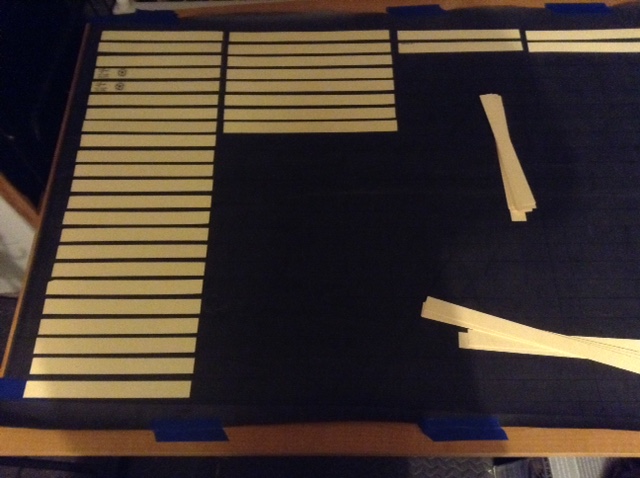 The depth of the bellows is based on the necessary extension, allowing for the base box, and using 1 in. pleats. This was in the order
of 23 folds and allowing some loss from the bellows not extending fully. Using the box base meant I could reduce the overall length of the bellows. Because the box is only just wide enough for the 8x10 holder, and not the more normal 10x10 dimension internally, using the box as an extension avoided the bellows vignetting the image.
The card stiffeners came from manila file inserts, stuck down with a paper/cloth white glue on one layer of the blackout material. The two layers were then stuck using a 3M contact spray adhesive. Some masking of the work was needed - this stuff sticks to everything. The glue was allowed to set for a couple of days before the panels were trimmed to final size.
The cloth tape was used to connect the four panels with a layer inside and out. Care was taken to ensure that the stiffeners aligned to allow for folding. Since the cloth tape was acting as the corner material, the stiffeners were cut square ended. The fold spacing was 1” - this is a big bellows without a taper, so it did not need a lot of folds.
Folding required a lot of big binder clips to keep it all together while the sequence of folds was made. Then the whole thing was placed under a weight to set the shape. After a day the clips were removed and the weight replaced to continue the setting of the shape.
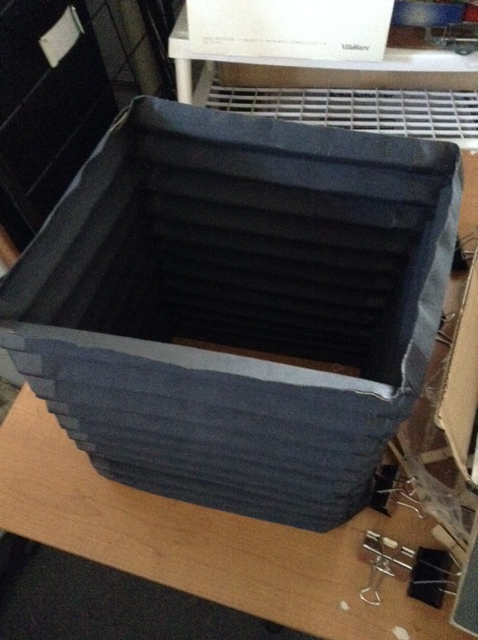 The bellows is glued and stapled to the inside of the front standard, and fixed to the rear standard with heavy duty adhesive black Velcro ®. This allows the standards to be split - and I can mount a pinhole front if I want to go back to the original intent of a basic box.
Materials
Apart from the bellows material which was already on hand, the craft boxes, and the aluminium tube, most of the rest of the construction used red oak and poplar pre-cut pieces from the ‘project’ section of the local hardware store.
Weight
A loaded Fidelity Elite 8x10 double darkslide (film holder) weighs approximately 1.5 lbs (around 680g), so four film holders is 6lbs (2727g). A 4x5 Fidelity Elite is around 6.5 oz. so four is 1.5 lbs - about what one would expect as they are one quarter the size.
The Schneider 270mm G-Claron f9 with caps, 77mm step up ring, and a Wista lens board weighs 1 lb 1 oz (482g).
The camera with focus screen weighs 7lb 3oz (3267g).
So all up, we get 14 lbs 4 oz (6476g). This does not include bags, tripod darkcloth, filters, loupe, cable release, and the other odds and ends in a kit.
A Wista 4x5 DX in Cherry (which has a glass focus screen) comes in at 4 lbs 13 oz, including a 150mm Sironar and a DIY metal baseplate addition. Add in the film holders, and we have 6 lbs 4 oz, about 2840g. That’s about two and a quarter times as heavy for the 8x10 compared to the 4x5 Wista. Of course, everything is relative. My MPP VII all-metal technical camera with 150mm lens comes in at 7 lbs 4 oz on its own.
For comparison, a Wista 8x10 DX is listed at 10lbs without lens. The 8x10 Wista folds smaller (12x12x3.75”) versus mine at 12x9x9” if removed from the rail and the rail is 24” long. So my camera is getting close to twice the volume.
Tabulated weights, approximate, and for comparison only
| Item | MPP VII | Wista DX | Wista 8x10(1) | Hardware 8x10 |
|---|---|---|---|---|
| Lens | 150mm Sironar | 150mm Sironar | 270mm G-Claron | 270mm G-Claron |
| Film 4 x 4x5 | 1.5 Lbs | 1.5 lbs | - | - |
| Film 4 x 8x10 | - | - | 6 lbs | 6 lbs |
| Camera with lens | 7 lbs 4 oz | 4 lbs 13 oz | 11 lbs 1 oz | 8 lb 4 oz |
| Total | 8 lbs 12 oz | 5 lbs 5 oz | 17 lbs 1 oz | 14 lbs 4 oz |
(1) Data from published sources for the camera. other weights by direct measurement.
Initial tests
The first test was done with photographic paper, and was mostly to identify any gross light leaks. This was done with a pinhole to allow for extended exposure while also providing a recognisable image. This test passed OK.
The second test used Ilford HP5 plus, EI 200 and processed in Thornton Two Bath on a Jobo using a 2830 print drum with times of 6+5 for the two baths. Two test photographs were made, one using the 270mm G-Claron f8 (1/30s f22) and the other using the Rodenstock Sironar 210mm f5.6 rear element for a 315mm (1/8s f45). Both photographs were focused on the same foreground element. Near and far elements were also present. The aim of this test is to pick up finer light leaks, test the focus screen position compared to the film, and also do a quick comparison of the Sironar as an alternate lens for the setup. The expectation is that the converted Sironar will be adequate for contact print use, but not do too well if enlarged.
Test results

Again, no obvious light leaks. Always a nice result.
This 300dpi section (negative scan) from the center of the 270mm G-Claron test sheet proves it is all working. Ilford HP5+, Thornton Two Bath 6+5 minutes, rotary processed in a Jobo 2830 print tank. Scanned from the negative using an Epson 4870, which is not optimized for this size of original.
Design limitations
There are some good and bad points. Most of these were anticipated going in.
The bellows
This is definitely too thick for convenience - it tends to push the front standard forward. It is not all bad - it provides some resistance when using rear movements, and since the tilt and rise are on the same control, this can be a help.
The exchangeable screen
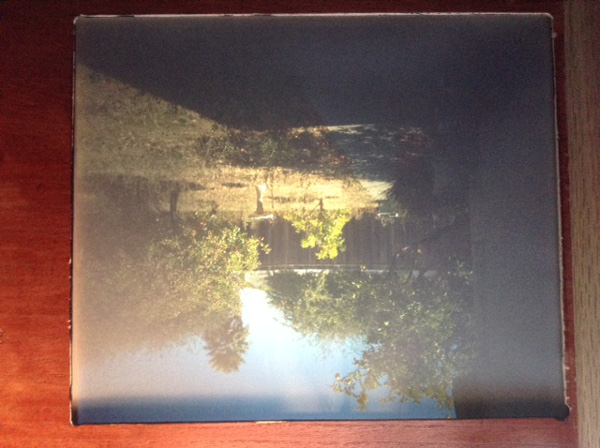
It is not as awkward as might be expected - the screen goes where the film holder is carried during the exposure. The biggest drawback is that it is necessary to do more on the camera, namely remove the screen, insert the film holder, pull the darkslide, make the exposure, replace the darkslide, remove the film holder, replace the focus screen. That is two insertion cycles. A spring back makes for one cycle.
The focus screen
This consists of a thin tracing film backed by 1/8” clear acrylic. This works well on sunny days with the slow lenses, but can be a little dark for interiors.
The rail
The parallel tube rail works very well. The pair of 3/4” aluminium tubes are more than rigid enough and do not add much to the overall weight. Using carriage bolts avoids twisting, since the square portion between the thread and the domed head fits the gap between the rails. There is a chance of binding and wear since the bolts are steel, but a new rail pair is not hard to fabricate.
The focus slide
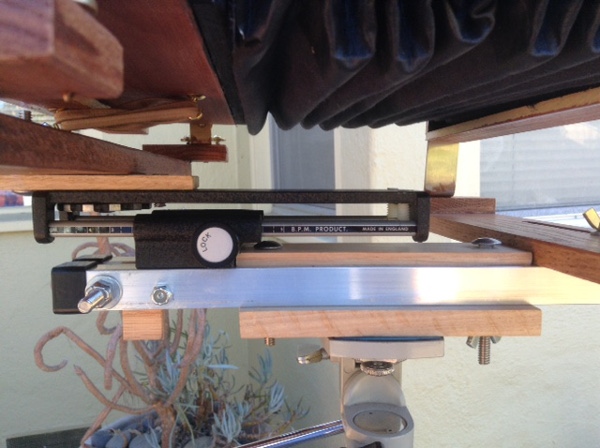
The original plan was to rely on friction for control and to slide the rear standard for focus. Putting in the focus slide (part of my 35mm kit from doing macro work) was a great improvement. This provides up to 100mm of motion, plenty for focus. It required a 1 3/4in. block inserted under the front standard to even them up, but that let me separate the front standard clamp bolt from the shift/swing bolt.
Lens mount
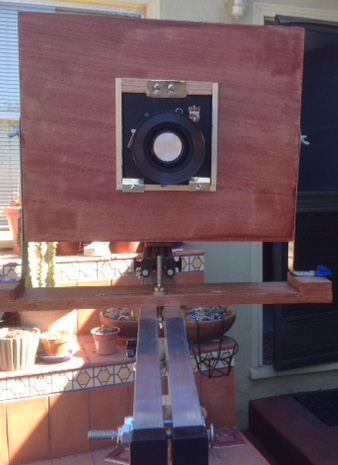
I decided to incorporate the ability to use both Linhof/Wista and MPP lens boards. In fact any square 4x4 in. boards might work. This was done by facing the inside of the frame with Velcro loop, and providing both a brass slide clamp (Linhof/Wista)and a pair of wooden twist clips (MPP VII).
Movements
The front standard mounts are more rigid than the friction slides I adapted for the back. I think I will replace those with parts from another pair of T bevels. The back is where I really need to do movements. At the moment the front movements mainly assist in centering the lens on the back.
Costs
There were some secondary costs which are not included, such as extra clamps and a large hole drill, which I consider not part of the project as they are reusable.
- Wood 0.25x1.5x24” Red Oak hardwood @ $1.99 6 = $11.94
- Wood 0.25x0.25x24” basswood @ $0.79 6 = $ 4.76
- Flat black paint $ 4.99
- Friction lid supports 2 @ $3.29 $ 6.58
- Clear Acrylic sheet $ 6.00
- T-bevels 2@ $5.69 $11.38
- Aluminium 0.75x0.75x24’ tube, 2 $ 8.00
- Carriage bolts wing nuts, washers, brass sheet $20.00
- Craft boxes, 2 $16.00
Total materials $89.65, or just under $100 with sales tax.
Fidelity Elite Film Holders, used, good condition x3 $200
So the project comes in at under $300 at 2016 prices.
This does not include processing (trays or in my case a Jobo with a 2830 print drum), storage sleeves, chemicals, or film (Ilford is running at around $110 per 25 sheets before tax when this was written).
Tools
Power drill Used for the hole saw, pilot holes, drilling the aluminium tube, pilot drilling for the routed slots in the standards.
Hobby rotary tool with router table Used to make the slots in the standard. Under powered for the job - it needed several passes, and cutting from both sides.
Jig saw Used to cut the large openings in the box and box lid.
Handsaw Most wood cutting not done by power tools.
Hacksaw Trimming bolts.
T-square used for lining out the bellows ribs.
Glue Standard wood glue for the wood components. Fabric/paper PVA for bellows connections. 3M spray contact adhesive for layering the bellows.
Flat black paint and wood stain for finishing.
Work bench and plenty of clamps of various sizes for setting up the work.
Wish list maybe a small table saw and drill-press/router would make a neater job. Or maybe not. The operator is the main limitation!
Live Test
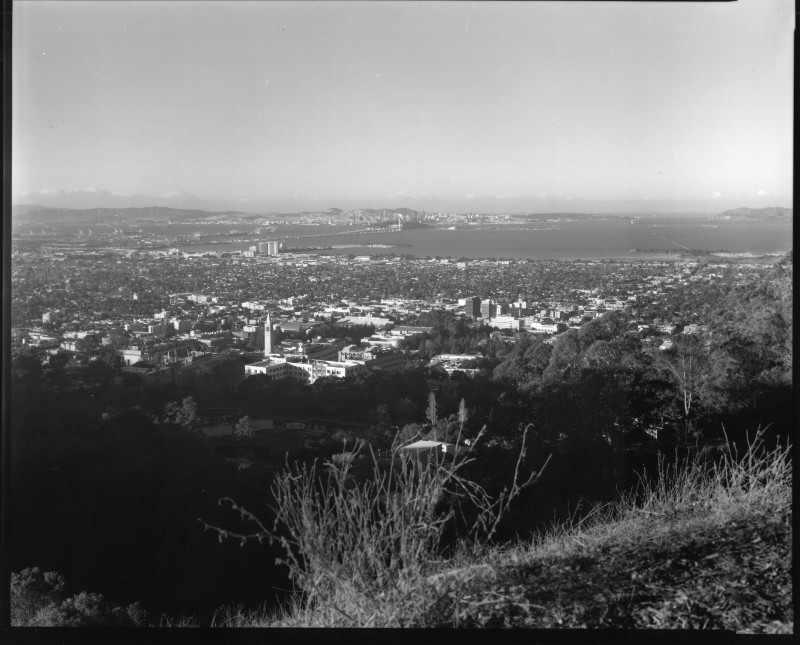
SF Bay and San Francisco from the Lawrence Hall of Science, UC Berkeley. 7:45am in November. 270mm f9 G-Claron, 1/8 @ f45, Red filter (3 stops), HP5+ in Thornton Two Bath 6+6, contact printed on Ilford Warmtone FB.
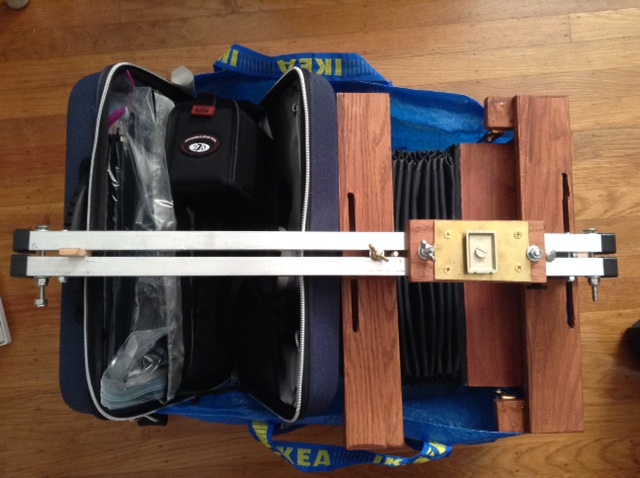
Finding a way to carry it is a challenge. It can be split and the two halves set parallel to the rail, but leaving it assembled is about as convenient. Here it is in an IKEA carryall with some foam padding in the base with the darkcloth. The briefcase has the film holders, spotmeter, filters, etc. The Lens case normally rides in the main bag. I will need something different eventually, but this at least lets me carry it all short distances.
