5x4 Development Tubes
Initially I didn’t do a lot of work with 5x4 sheet film. Not enough to warrant using large capacity tanks, at least. A motorized base and drum was also an unessential item at that time. So this left me with conventional tray development, or trying a self- constructed developing tube.
I went with the tube option. This requires some 1.5 inch diameter black ABS pipe, two caps, three joining pieces, and three discs cut from black ABS sheet. The pipe, fittings, and pipe cement came from the local hardware/home improvement store, and the 0.060 inch ABS sheet came from a local plastics supplier. Rubber would have been an alternative, but the ABS sheet works well. The basic design derives from an original design on the now defunct medfmt.8k.com site with adjustments for local materials.
The developing tube is assembled into three parts. The base ‘tank’ composed of a length of pipe and a cemented cap, the light-trapped filler from three short (3 inch) lengths of pipe, three junctions, and three ABS sheet discs with a chord trimmed about a third of the way across. The other end cap was left uncemented, resulting in three parts.
This illustration shows the assembly.
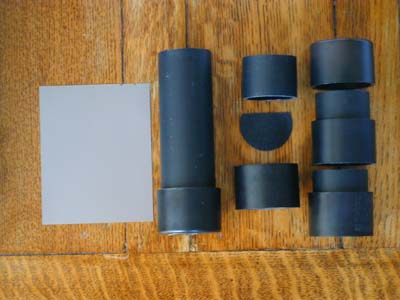
One of the light-trap sections is shown unassembled, and the other two sections have still to be cemented together. The gaps in the light trap sections are assembled on alternating sides to make a labyrinth. A sheet of 5x4 film is shown for scale.
In use, the film is curved around the long axis and slid inside the tube in the dark, and the light trap and lid pushed on. The friction junctions are not totally liquid tight, but the volume of leakage is not significant. All subsequent processing is done in the light. The tubes can be used for roller processing, but I usually process by the standard inversion method. I find that 175ml of solution is adequate. This is about twice the solution per unit area of film that I need for spiral development with 35mm and 120/220 formats.
The filling head has enough volume to drain the film during inversion. A full inversion cycle takes about 7 seconds. The anti-halation backing clears by the end of the fix stage, but probably won’t clear in the developer.
Construction costs were reasonable. The cost per tube is about $6, and the usual 8 foot pipe length will make about 9 tubes (at 3x 1.5 inch and 1x 5.5 inch sections) if you buy enough caps and joining pieces. I used a mitre saw to cut the pipe with square ends. At a minimum you need a mitre box and a hacksaw. Expect to clean the sawn ends with a sharp knife and fine sandpaper.
A further refinement I am working on is a rack to hold several pipe tanks for simultaneous development.
For washing, I transfer the film to the rack of an old ‘Yankee’ tank, and run a hose into the central column for a bottom to top wash flow. This has enough capacity for the amount of film I am likely to process at any one time.